
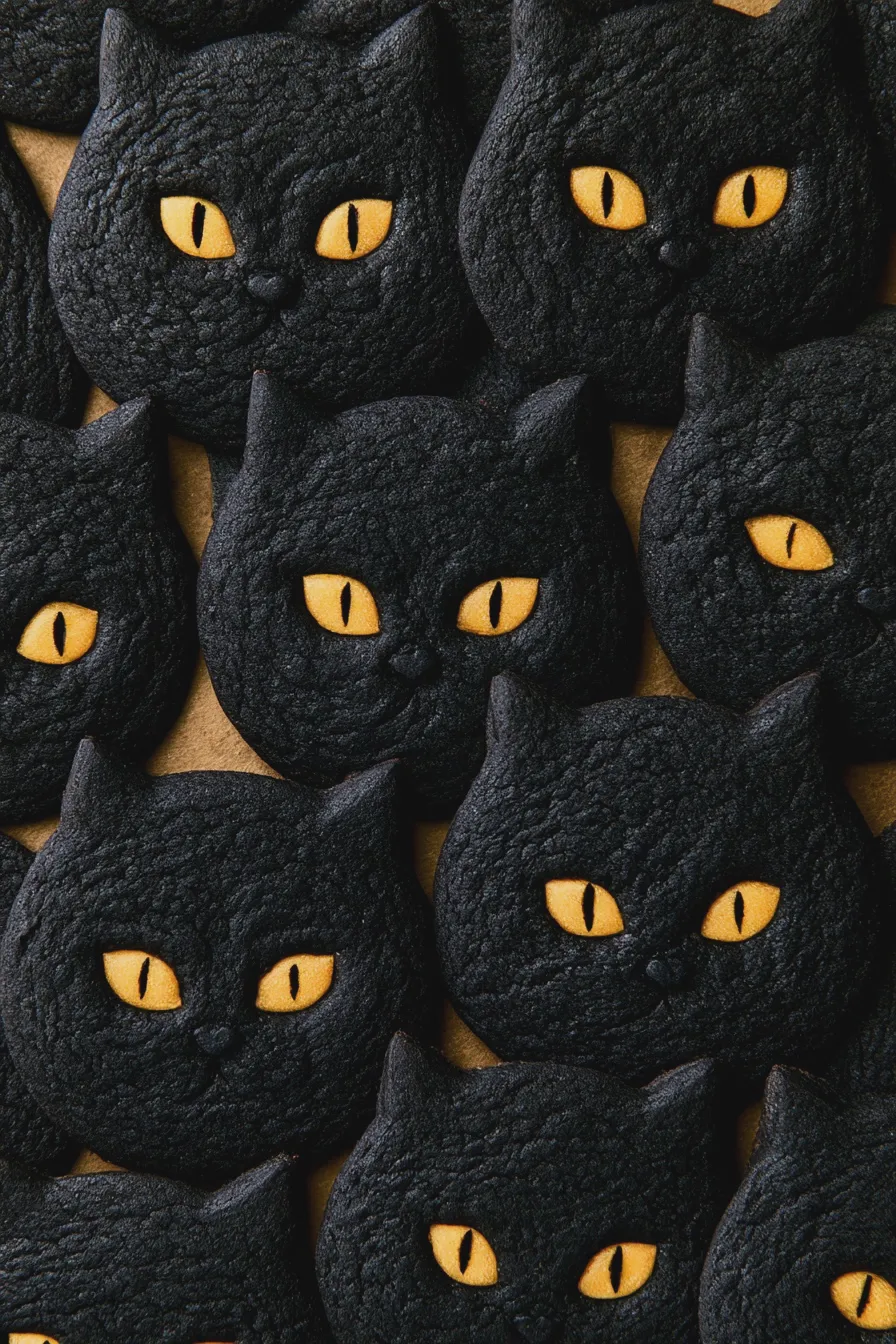
Get ready for some bewitching baking fun with these adorable black cat cookies! Whether you’re planning a spooky Halloween party or just looking for a fun afternoon activity, these cookies are sure to be a hit. They’re a fantastic addition to any spread of Halloween cookies, offering a touch of feline charm to your festive treats. We’ll guide you through every step, ensuring your black cat cookies turn out as delightful as they taste.
The Magic Behind Black Cat Cookies
Black cat cookies are a classic for a reason. Their simple yet striking design makes them perfect for the season. We’ll be focusing on a sugar cookie base, which is wonderfully versatile and holds its shape beautifully for cutting out those iconic cat silhouettes. This recipe is designed to be straightforward, even for those newer to baking. You’ll find that this particular black cat cookie recipe is a crowd-pleaser.
The key to great cut-out cookies lies in a few fundamental techniques. We want a dough that’s firm enough to hold intricate shapes but tender enough to melt in your mouth. This often involves a balance of ingredients and proper chilling. For those looking for similar spooky treats, you might also enjoy exploring easy Halloween treats that include other fun shapes and flavors.
Ingredients You’ll Need
Gathering your ingredients is the first step to baking success. For our black cat sugar cookies, you’ll need:
- All-purpose flour
- Granulated sugar
- Unsalted butter, softened
- Large eggs
- Vanilla extract
- Baking powder
- Salt
- Black food coloring (gel works best for intense color)
- Optional: Powdered sugar and milk for a simple glaze, or your favorite royal icing for decorating
Having good quality ingredients makes a difference. For instance, using good butter contributes to a richer flavor. Ensure your butter is softened, not melted, as this is crucial for the creaming method.
Equipment Essentials
Before you begin, make sure you have these essential tools:
- Mixing bowls
- Electric mixer (stand or hand mixer)
- Measuring cups and spoons
- Rolling pin
- Black cat cookie cutters (various sizes if you like!)
- Baking sheets
- Parchment paper or silicone baking mats
- Wire cooling racks
Having the right black cat cookie cutters is essential for achieving those perfect shapes. If you don’t have a specific black cat cutter, a simple cat silhouette or even a round cookie cut in half with some added ears can work in a pinch!
Step-by-Step Guide to Black Cat Cookies
Let’s get baking! Follow these steps for perfectly shaped and delicious black cat cookies.
Looking for more? Try this delicious Creaming Method For Cakes And Cookies next.
1. Creaming the Butter and Sugar
This is where the magic begins. In a large mixing bowl, cream together the softened unsalted butter and granulated sugar until light and fluffy. This process incorporates air into the dough, which helps with the texture of the final cookie. A Creaming Method For Cakes And Cookies article can offer more insights into this crucial step. Aim for about 3-5 minutes with an electric mixer.
Tips: Ensure your butter is truly softened – it should yield to gentle pressure but not be greasy. This step is vital for creating tender cookies.
Mistakes to Avoid: Over-creaming can sometimes lead to cookies that spread too much. Conversely, under-creaming will result in a denser cookie.
2. Adding Wet Ingredients
Beat in the eggs one at a time, mixing well after each addition. Then, stir in the vanilla extract. This combination forms the liquid base of your cookie dough.
3. Combining Dry Ingredients
In a separate bowl, whisk together the all-purpose flour, baking powder, and salt. Whisking ensures these dry ingredients are evenly distributed, which prevents pockets of leavening agents or salt in your final cookies.
4. Incorporating Dry into Wet Ingredients
Gradually add the dry ingredients to the wet ingredients, mixing on low speed until just combined. Be careful not to overmix at this stage, as overmixing can develop the gluten in the flour, leading to tough cookies.
5. Achieving the Black Color
Now for the fun part! Add your black food coloring. Gel food coloring is recommended because it’s highly concentrated and won’t add extra liquid to your dough, which could affect the consistency. Start with a small amount and add more until you achieve a deep, rich black color. Mix until the color is uniform throughout the black cat cookie dough.
If you enjoyed this, you might also love our How To Make Ice Cream At Home recipe.
Baking Explanation: Food coloring is essentially a dye that imparts color. Gel colors are thicker and more potent than liquid colors, making them ideal for achieving dark hues without altering the dough’s moisture content.
6. Chilling the Dough
This is a critical step for cut-out cookies. Divide the dough in half, flatten each half into a disk, wrap tightly in plastic wrap, and refrigerate for at least 2-3 hours, or preferably overnight. Chilling solidifies the fat in the dough, making it easier to roll and cut without spreading during baking. This helps maintain the sharp edges of your spooky cookies.
Tips: If you’re in a hurry, you can speed up the chilling process by flattening the dough disks thinly and placing them in the freezer for about 30-60 minutes, but be careful not to freeze it solid.
7. Rolling and Cutting
Preheat your oven to 350°F (175°C). Line your baking sheets with parchment paper or silicone mats. Lightly flour your work surface and rolling pin. Take one disk of chilled dough and roll it out to about 1/4-inch thickness. Use your black cat cookie cutters to cut out shapes. Re-roll scraps gently, chilling again if the dough becomes too soft.
Examples: You can use different sized black cat cookie cutters to create a variety of cats on your baking sheet. Consider making some larger cats and some smaller ones for visual interest.
8. Baking the Cookies
Carefully transfer the cut-out cookies to the prepared baking sheets, leaving about an inch between them. Bake for 8-12 minutes, or until the edges are lightly set. The baking time will vary depending on the size of your cookies and your oven. For these black cat cookies, you want them to be firm but not browned.
Mistakes to Avoid: Overbaking will result in hard, dry cookies. Keep a close eye on them, especially towards the end of the baking time.
Looking for more? Try this delicious How To Fold Ingredients Without Deflating next.
9. Cooling the Cookies
Let the cookies cool on the baking sheets for a few minutes before carefully transferring them to wire racks to cool completely. This allows them to firm up properly before decorating.
Decorating Your Black Cat Cookies
Once your cookies are completely cool, it’s time to let your creativity shine! You can opt for simple elegance or go all out with intricate designs.
Simple Glaze
For a quick and easy decoration, whisk together about 1 cup of powdered sugar with 1-2 tablespoons of milk until smooth. You can add a tiny drop of black food coloring for a darker glaze, or leave it white for contrast. Dip the tops of the cookies into the glaze or spread it on with a knife. Let the glaze set completely.
Royal Icing Designs
For more detailed decorated black cat cookies, royal icing is the way to go. You can outline the cat shapes and then flood them with black icing. Once dry, use a contrasting color like white or yellow for eyes and whiskers. There are many tutorials online for different royal icing techniques if you want to explore further.
Tips: For outlining and flooding with royal icing, you’ll need two consistencies: a stiffer “outline” consistency and a thinner “flood” consistency. This allows for crisp lines and smooth fills.
No-Bake Option
If you’re short on time or prefer not to bake, consider no bake black cat cookies. You can use pre-made cookies (like Oreos or chocolate wafers) and decorate them with black frosting or candy melts. Alternatively, you can create no-bake cookie balls and shape them into cats, or use chocolate-covered pretzels as a base.
Tips for Perfect Black Cat Cookies Every Time
Here are some extra pointers to ensure your Halloween baking is a smashing success:
Looking for more? Try this delicious How To Prepare A Cake Pan To Prevent Sticking next.
- Chilling is Key: Don’t skip the chilling step! It’s the most important part of getting clean cuts and preventing spread.
- Dough Temperature: If your dough becomes too soft while rolling, pop it back in the fridge for 15-20 minutes.
- Even Thickness: Roll your dough to an even thickness for consistent baking. Using dough strips or guides on your rolling pin can help.
- Don’t Overmix: Overmixing the flour develops gluten, leading to tough cookies. Mix until just combined.
- Oven Temperature: Ensure your oven is accurately preheated. An oven thermometer can be very helpful.
- Storage: Store cooled, undecorated cookies in an airtight container at room temperature for up to a week. Decorated cookies may have a shorter shelf life depending on the icing used.
Common Mistakes and How to Avoid Them
Even experienced bakers encounter challenges. Here are some common pitfalls with cut-out cookies:
- Spreading Cookies: This is usually due to not chilling the dough enough, using too much leavening, or having too much sugar. Ensure your butter and sugar are creamed properly but not excessively.
- Tough Cookies: Overmixing the dough after adding flour is the main culprit. Also, overbaking can contribute to toughness.
- Sticking to Cutters: Lightly flouring your cookie cutters and dough surface helps prevent sticking. If using intricate cutters, a small brush can help remove excess dough.
- Uneven Baking: Rotating your baking sheets halfway through the baking time can help ensure even cooking. Ensure your oven heats evenly.
Beyond Black Cats: More Spooky Cookies
While black cat cookies are a star, don’t forget to explore other best Halloween cookie recipes! Consider adding some ghost cookies, witch cookies, or fun monster cookies to your Halloween baking ideas lineup. These themed cookies make for a festive and delicious spread that everyone will love.
If you’re looking for more simple Halloween cookie ideas, think about simple shapes with a bit of spooky flair. Chocolate cookies are also a fantastic option, perhaps a chocolate black cat cookies variation if you’re a chocolate lover!
Print

Black Cat Cookies Quick and Easy Halloween Treat
Description
These adorable black cat cookies are a fun and festive treat for Halloween or any cat-lover’s celebration. They’re surprisingly easy to make with simple ingredients and a touch of creativity.
Ingredients
- 2 ½ cups all-purpose flour
- 1 teaspoon baking powder
- ½ teaspoon salt
- 1 cup (2 sticks) unsalted butter, softened
- 1 ½ cups granulated sugar
- 2 large eggs
- 1 teaspoon vanilla extract
- Black food coloring
- For Decorating: Black icing, edible googly eyes, white icing (optional)
Instructions
- In a medium bowl, whisk together flour, baking powder, and salt. Set aside.
- In a large bowl, cream together softened butter and granulated sugar until light and fluffy.
- Beat in eggs one at a time, then stir in vanilla extract.
- Gradually add the dry ingredients to the wet ingredients, mixing until just combined.
- Divide the dough into two portions. Leave one portion plain and tint the other with black food coloring until a deep black color is achieved.
- Wrap each portion of dough separately in plastic wrap and refrigerate for at least 30 minutes.
- Preheat oven to 350°F (175°C). Line baking sheets with parchment paper.
- On a lightly floured surface, roll out the black dough to about ¼-inch thickness. Cut out cat shapes using a cookie cutter.
- Roll out the plain dough to about ¼-inch thickness. Cut out smaller ear shapes to attach to the top of the cat heads.
- Carefully place the cookies onto the prepared baking sheets.
- Bake for 10-12 minutes, or until the edges are lightly golden.
- Let the cookies cool on the baking sheets for a few minutes before transferring them to a wire rack to cool completely.
- Once cooled, decorate the black cat cookies with black icing for outlines, add edible googly eyes, and any other desired details.
Notes
- For sharper cookie shapes, chill the cut-out dough for another 15-20 minutes before baking.
- If you don’t have a cat-shaped cookie cutter, you can freehand cut simple cat shapes.
- Experiment with different decorating techniques for unique cat faces.
Nutrition
- Serving Size: 1 cookie
- Calories: 200
- Sugar: 15g
- Sodium: 50mg
- Fat: 10g
- Saturated Fat: 6g
- Carbohydrates: 25g
- Protein: 2g







