
Create spooktacularly fun decorated Halloween cookies with this easy-to-follow recipe, perfect for adding a festive touch to your celebrations. These versatile sugar cookies are designed for decorating, making them ideal for all your creative Halloween cookie decorating ideas and ensuring they’re among the best Halloween cookie recipes you’ll try.
As the leaves turn golden and the air grows crisp, there’s a special kind of magic that descends, calling us to embrace the season’s playful spirit. This recipe for decorated Halloween cookies is your gateway to that magic, offering a delicious canvas for your most creative Halloween cookie decorating ideas. Whether you’re aiming for charming ghost cookies, classic pumpkin cookies, or something more ghoulishly delightful, these cookies are sure to be a hit.
Why You’ll Love These Decorated Halloween Cookies
These decorated Halloween cookies are a dream for anyone looking to add a personal, festive touch to their holiday celebrations. They provide a sturdy yet tender base, perfect for holding vibrant icing and intricate designs, making them some of the most versatile Halloween sugar cookies you can bake. You’ll find that they are not only incredibly fun to decorate but also wonderfully delicious to eat, a delightful combination that makes them stand out among Halloween cookie recipes.
Beyond their deliciousness, these cookies are designed with the home baker in mind, ensuring a straightforward process from dough to dazzling decoration. They are fantastic for engaging children in holiday activities, turning your kitchen into a hub of creativity and fun. Plus, the satisfaction of presenting your own unique, edible Halloween decorations is truly unmatched.
Ingredients for Halloween Sugar Cookies
To create these festive and delicious Halloween sugar cookies, you’ll need a few pantry staples and a touch of Halloween spirit. The quality of your ingredients will directly impact the flavor and texture of your finished spooky cookie recipes.
- 3 cups all-purpose flour, plus more for dusting
- 1 teaspoon baking powder
- 1/2 teaspoon salt
- 1 cup (2 sticks) unsalted butter, softened
- 1 1/2 cups granulated sugar
- 2 large eggs
- 1 teaspoon vanilla extract
- 1/4 cup milk (whole or 2%)
For the best results, ensure your butter is truly softened, not melted, as this will help create a smooth, cohesive dough. If you find your dough is too dry, a tablespoon or two of milk can help bring it together. Conversely, if it’s too sticky, a little extra flour will do the trick. These cookies are a wonderful base for all sorts of creative Halloween cookie decorating ideas, and they pair beautifully with a glass of milk or a warm mug of cider.
How to Make Decorated Halloween Cookies
Making these decorated Halloween cookies is a rewarding process that allows for plenty of creativity. Follow these steps carefully to achieve perfect sugar cookies ready for your most imaginative Halloween cookie decorating ideas.
Prepare the Cookie Dough
In a medium bowl, whisk together the flour, baking powder, and salt; set aside. In a large bowl, cream together the softened butter and granulated sugar until light and fluffy, about 3-5 minutes. Beat in the eggs one at a time, then stir in the vanilla extract. A common mistake is over-creaming the butter and sugar, which can lead to cookies that spread too much.
Combine Wet and Dry Ingredients
Gradually add the dry ingredients to the wet ingredients, alternating with the milk, beginning and ending with the dry ingredients. Mix on low speed until just combined, being careful not to overmix the dough. This gentle mixing ensures a tender cookie texture, which is crucial for both the taste and the ability to hold intricate designs.
Chill the Dough
Divide the dough in half, flatten each half into a disc, wrap tightly in plastic wrap, and refrigerate for at least 2 hours, or until firm. Chilling the dough is a critical step; it prevents the cookies from spreading excessively during baking and makes the dough easier to handle and roll out for precise cutting with Halloween cookie cutters.
Roll and Cut the Dough
Preheat your oven to 350°F (175°C) and line baking sheets with parchment paper. On a lightly floured surface, roll out one disc of dough to about 1/4-inch thickness. Use your favorite Halloween cookie cutters to cut out shapes like ghosts, pumpkins, bats, and spiders, then carefully transfer them to the prepared baking sheets.
Bake the Cookies
Bake for 8-12 minutes, or until the edges are lightly golden. The exact baking time will depend on the size and thickness of your cookies. Allow the cookies to cool on the baking sheets for a few minutes before transferring them to a wire rack to cool completely; this prevents them from breaking.
Decorate Your Spooky Creations
Once completely cool, it’s time for the fun part: decorating! Use royal icing, buttercream, or edible markers to bring your ghost cookies, pumpkin cookies, and other spooky cookie creations to life. For simple designs like spider webs, a basic white icing base with black icing drizzled on top can create a striking effect. You can also explore various Halloween cookie icing techniques for professional-looking results.
Consider using different piping tips for varied textures and details, or even edible glitter for a touch of Halloween sparkle. If you’re looking for more advanced techniques, explore how to create marbled effects or fondant cutouts. Remember, the goal is to have fun and let your creativity shine through your DIY Halloween cookies.
Halloween Cookie Decorating Ideas
The possibilities for decorating these Halloween sugar cookies are endless, offering a chance to create truly custom Halloween cookies that reflect your personal style. Whether you prefer simple elegance or elaborate designs, these ideas will inspire your spooky cookie recipes.
Classic Halloween Shapes
Embrace the iconic symbols of Halloween with classic shapes like pumpkin cookies, ghost cookies, and bat cookies. For pumpkin cookies, use orange icing and add a green stem, perhaps with a few black icing details for a jack-o’-lantern face. Ghost cookies can be made with simple white icing and two small black dots for eyes, or you can add a playful, flowing outline.
Spooky Monster Cookies
Let your imagination run wild with monster cookies! Use an assortment of colors and textures to create unique, ghoulish characters. Think mismatched eyes, jagged mouths, and vibrant, unnatural colors to make your monster cookies truly stand out. This is a great way to use up leftover icing colors and create truly unique, fun Halloween treats.
Eerie Spider Webs and Eyes
For a more subtle yet spooky effect, focus on intricate details like spider webs and eerie eyes. Use a base coat of black or dark purple icing, then pipe concentric circles with white or grey icing and drag a toothpick from the center outwards to create a perfect spider web. Alternatively, decorate cookies with various sizes of edible candy eyes for a creepy, staring effect.
Ghoulish Glitter and Sprinkles
Don’t underestimate the power of edible glitter and Halloween-themed sprinkles to transform your cookies. A dusting of black or iridescent glitter can add a magical shimmer, while themed sprinkles in shapes like bats, skulls, or candy corn can add texture and visual interest. These simple additions can elevate your cookies from basic to brilliant, making them some of the best Halloween cookie recipes for parties.
For those looking to explore more advanced edible Halloween decorations, consider using edible paint to add fine details or shading to your cookies. You can also use royal icing to create 3D elements, such as raised spider legs or textured witch hats. Remember to work with a consistent icing consistency for smooth application and sharp details, especially when creating intricate patterns like spider web cookies.
Tips for Perfect Decorated Halloween Cookies
Achieving beautifully decorated Halloween cookies involves a few key techniques and considerations. Following these tips will help ensure your cookies turn out perfectly, whether you’re a seasoned baker or new to decorative cookie making.
Icing Consistency is Key
The consistency of your icing is paramount for successful decorating. For outlining, a thicker, floodable consistency is best, allowing you to create clean lines that hold their shape. For filling in areas, a slightly thinner “flood” consistency works wonders, spreading smoothly to cover the cookie surface without overflowing.
Patience with Drying Times
Allow adequate drying time between icing layers, especially when working with multiple colors or detailed designs. Rushing this process can lead to colors bleeding into each other or smudged details. For complex designs, consider using a dehydrator on a low setting or simply letting them air dry overnight.
Proper Storage for Freshness
Once decorated and completely dry, store your cookies in airtight containers at room temperature. Avoid stacking them too high, as this can cause decorations to smudge. They can be stored this way for up to a week, making them excellent make-ahead treats for parties.
For longer storage, consider freezing undecorated cookies before baking or freezing decorated cookies once they are fully set. Ensure they are well-wrapped to prevent freezer burn. These cookies are wonderfully versatile, and you can even explore variations like red velvet cookies for a festive twist, or consider other classic cookie recipes like peanut butter cookies if you want a different flavor profile but still want to decorate them.
Print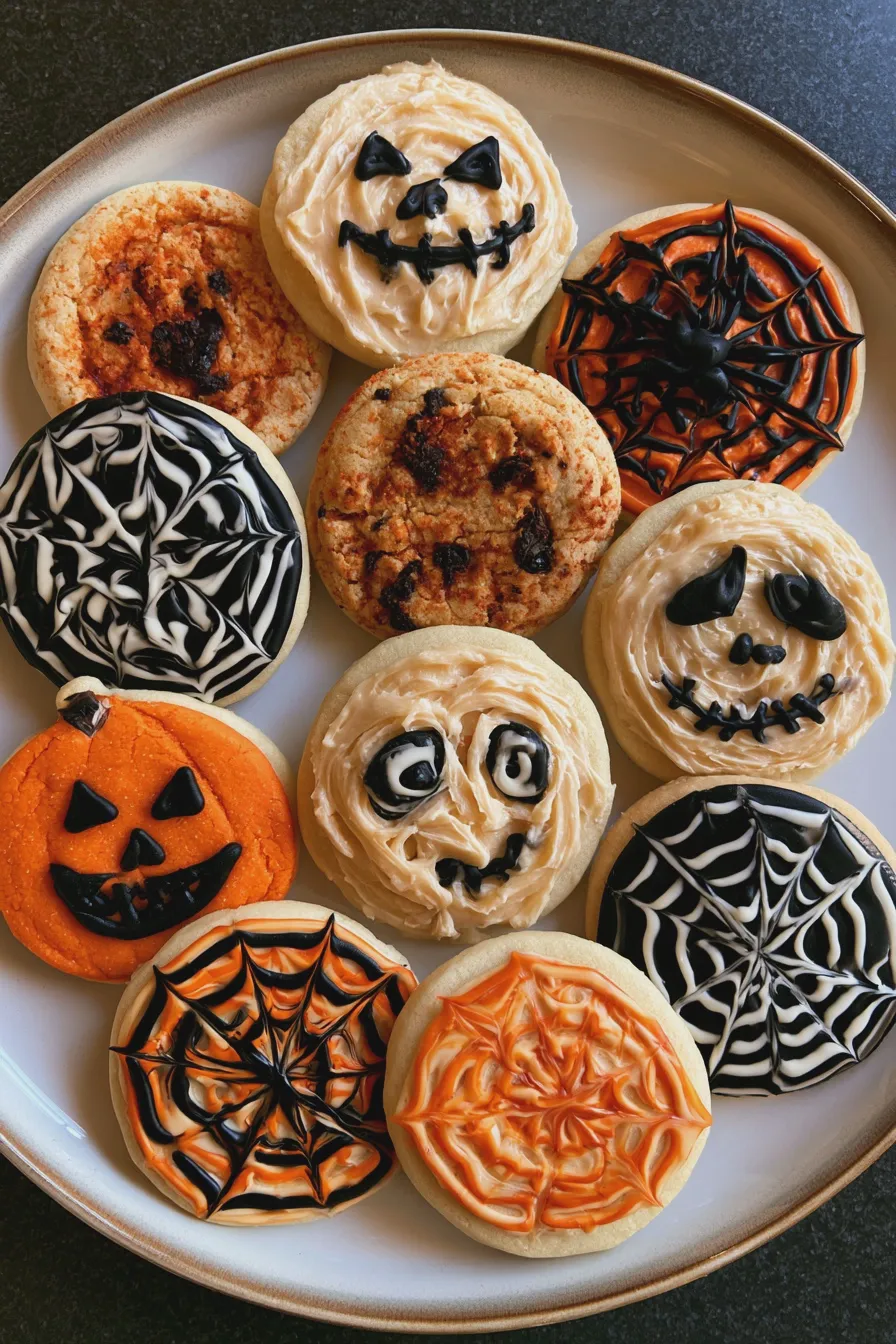
decorated halloween cookies Recipe
- Total Time: PT2H5M
- Yield: 24–30 cookies 1x
- Diet: Vegetarian
Description
Whip up these spooktacular decorated Halloween cookies for a festive treat that’s as fun to make as it is to eat! Perfect for parties or a fun family activity.
Ingredients
- 2 ½ cups all-purpose flour
- 1 teaspoon baking powder
- ½ teaspoon salt
- 1 cup (2 sticks) unsalted butter, softened
- 1 ½ cups granulated sugar
- 2 large eggs
- 1 teaspoon vanilla extract
- 1 teaspoon almond extract (optional)
- Royal icing (store-bought or homemade)
- Halloween-themed food coloring
- Assorted Halloween sprinkles and edible decorations
Instructions
- In a medium bowl, whisk together the flour, baking powder, and salt.
- In a large bowl, cream together the softened butter and granulated sugar until light and fluffy.
- Beat in the eggs one at a time, then stir in the vanilla extract and almond extract (if using).
- Gradually add the dry ingredients to the wet ingredients, mixing until just combined. Do not overmix.
- Divide the dough in half, flatten each half into a disc, wrap in plastic wrap, and refrigerate for at least 1 hour.
- Preheat oven to 350°F (175°C). Line baking sheets with parchment paper.
- On a lightly floured surface, roll out one disc of dough to about ¼-inch thickness. Cut out desired Halloween shapes using cookie cutters.
- Place cookies on the prepared baking sheets, about 1 inch apart.
- Bake for 8-10 minutes, or until the edges are lightly golden.
- Let cookies cool on the baking sheets for a few minutes before transferring them to a wire rack to cool completely.
- Prepare royal icing according to package directions or your recipe. Divide the icing into bowls and tint with Halloween-themed food coloring.
- Once cookies are completely cool, decorate with the colored royal icing. Use piping bags or spatulas to apply icing.
- Add sprinkles and edible decorations while the icing is still wet.
- Allow icing to dry completely before storing or serving.
Notes
- For crispier cookies, bake for an additional 1-2 minutes.
- Store decorated cookies in an airtight container at room temperature for up to a week.
- Get creative with your decorations! Use different colors, patterns, and edible glitter for unique designs.
- Consider making a cookie decorating kit for a fun party activity.
- Prep Time: PT45M
- Cook Time: PT10M
- Category: Cookies
- Method: Baking
- Cuisine: American
Nutrition
- Serving Size: 1 cookie
- Calories: 180
- Sugar: 15g
- Sodium: 50mg
- Fat: 9g
- Saturated Fat: 5g
- Unsaturated Fat: 4g
- Trans Fat: 0g
- Carbohydrates: 22g
- Fiber: 1g
- Protein: 2g
- Cholesterol: 30mg







