")
Table of Contents
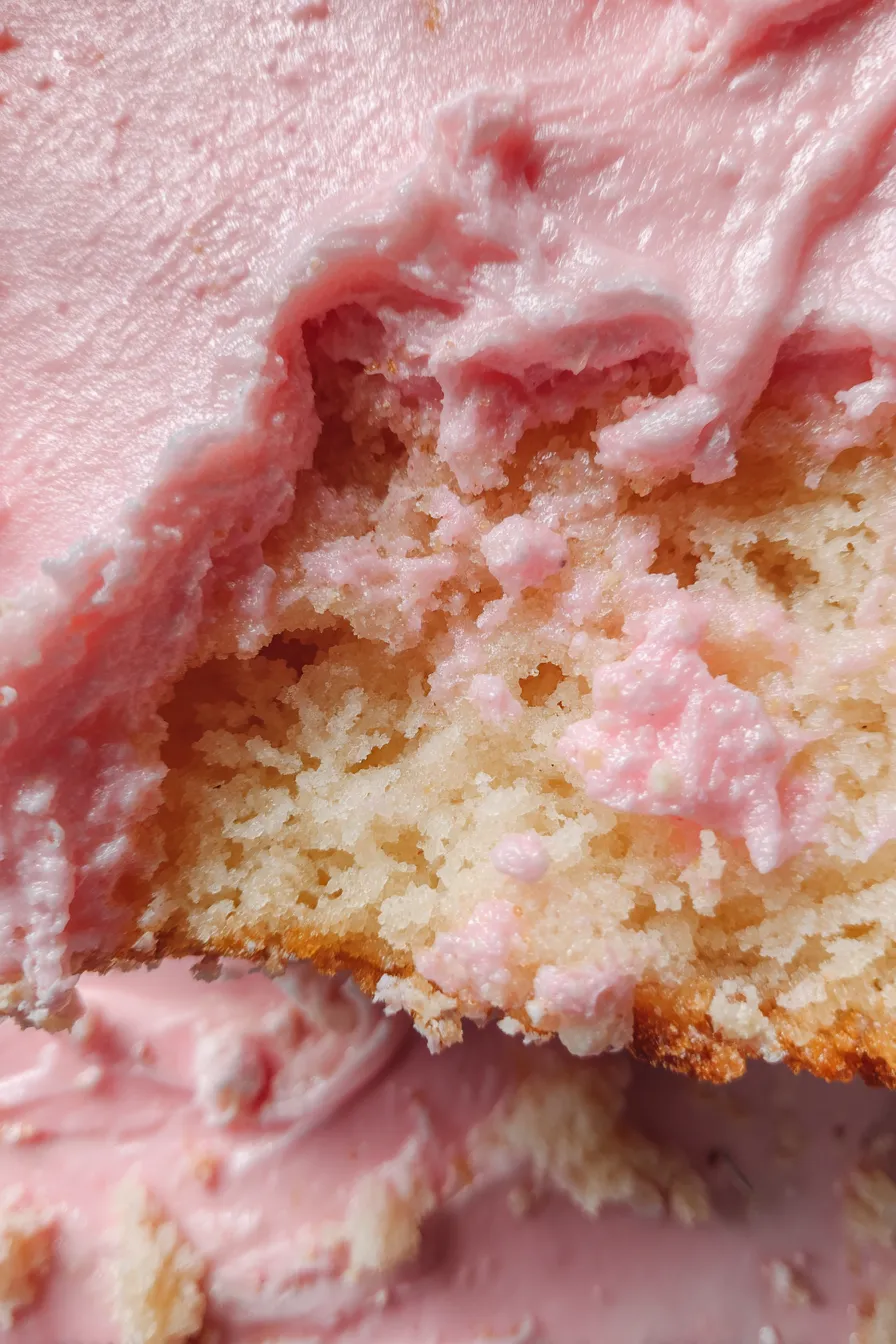
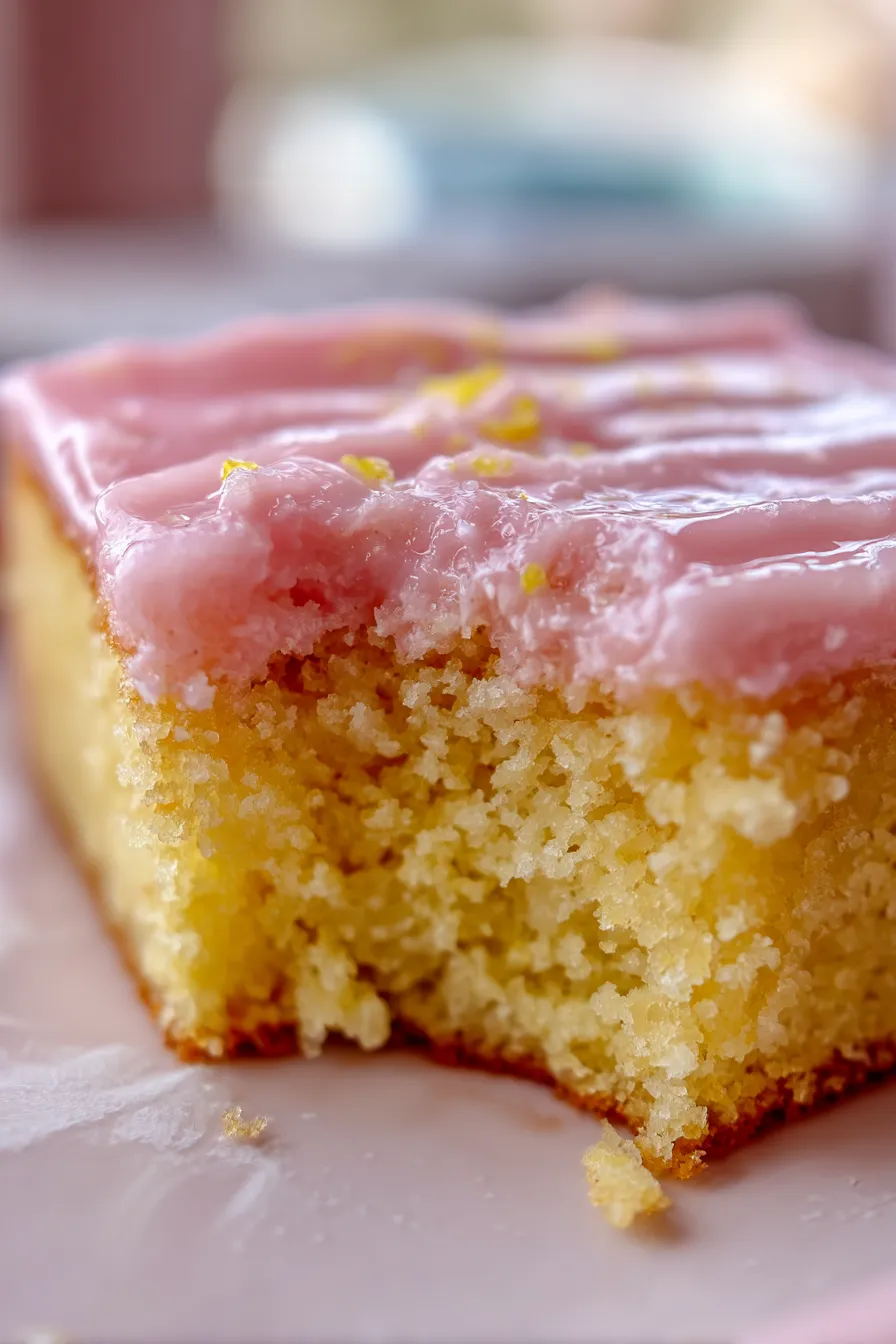
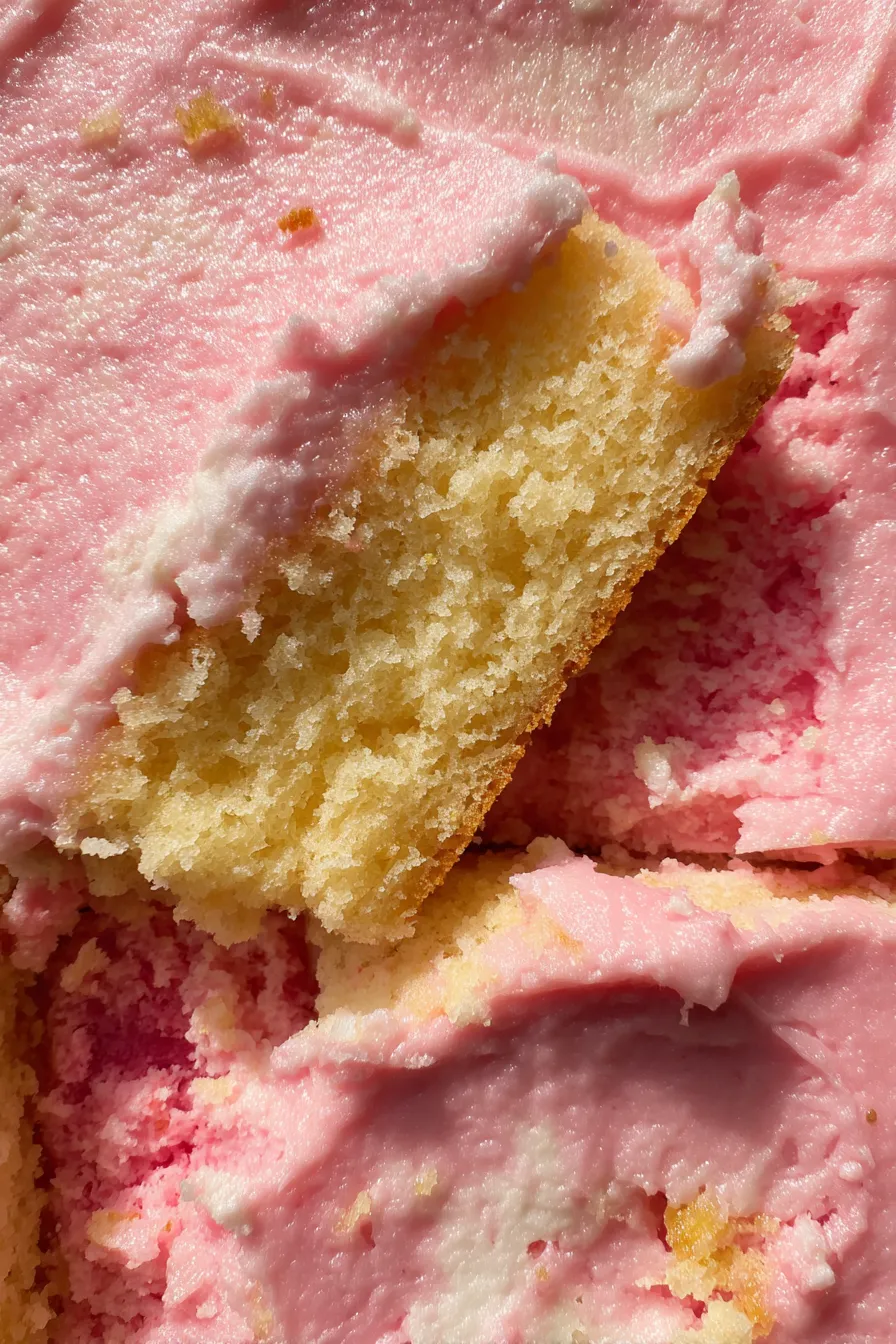
There’s something undeniably cheerful about a pink lemonade sheet cake, isn’t there? It’s the perfect treat for warm weather gatherings, birthdays, or any time you want to brighten someone’s day. The vibrant color, the sweet-tart flavor… it’s like sunshine on a plate! It’s also a wonderfully simple dessert to make, perfect for both novice and experienced bakers alike. If you’re looking for a delightful confection that’s sure to please, you’ve come to the right place.
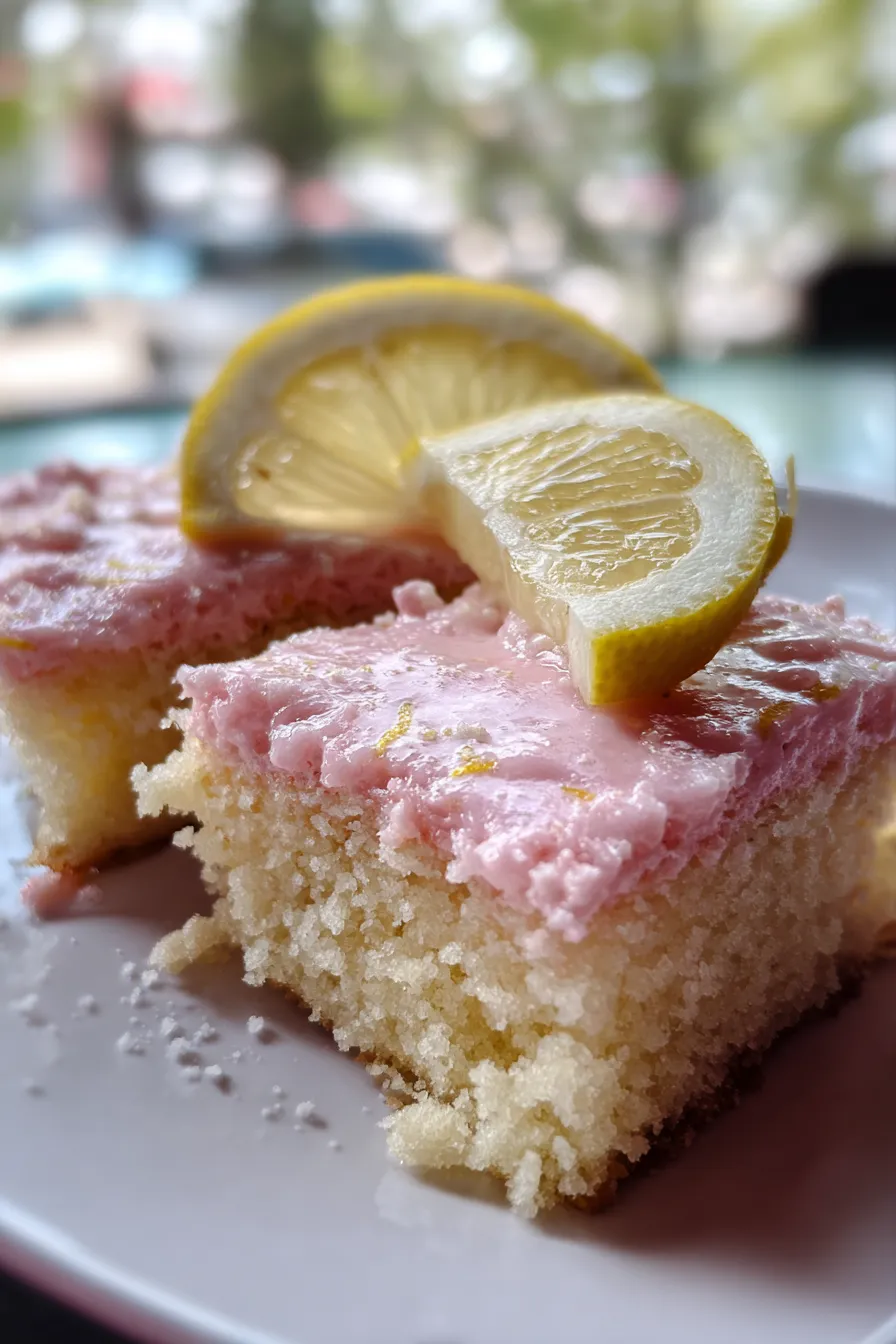
This cake captures the essence of refreshing pink lemonade in a soft, tender cake. Imagine the delightful tang of lemons perfectly balanced with sweetness, all topped with a luscious frosting. Whether you’re planning a summer picnic or simply craving a sweet treat, this cake is guaranteed to be a hit. You can find inspiration for other delicious desserts here.
This recipe is designed to be easy to follow, with clear instructions and helpful tips. Get ready to bake a cake that’s both beautiful and delicious! Let’s get started on this pink lemonade cake recipe!
What You’ll Need to Make Pink Lemonade Sheet Cake
Before we dive into the delicious details, let’s gather our ingredients. This recipe uses ingredients that are readily available in most kitchens, making it a convenient choice for any baker. It’s always a good idea to measure your ingredients carefully for the best results. Accurate measurements are key to achieving the perfect texture and flavor. Let’s get started and gather the ingredients we need to make this homemade pink lemonade cake.
For the cake, you’ll need the usual suspects with a few key additions to get that signature pink lemonade flavor. The frosting is equally simple, relying on a few basic ingredients to create a creamy, dreamy topping. If you’re looking for other pink cake recipes, you can find a lot of inspiration online!
Ingredients
Here’s what you’ll need to create this delightful cake:
- 2 1/2 cups all-purpose flour
- 1 1/2 teaspoons baking powder
- 1/2 teaspoon baking soda
- 1/2 teaspoon salt
- 1 cup (2 sticks) unsalted butter, softened
- 2 cups granulated sugar
- 2 large eggs
- 1 teaspoon vanilla extract
- 1 cup buttermilk
- 1/2 cup pink lemonade concentrate, thawed
- Pink food coloring (optional, gel recommended)
For the frosting:
- 1 cup (2 sticks) unsalted butter, softened
- 3-4 cups powdered sugar, sifted
- 1/4 cup pink lemonade concentrate, thawed
- 1 teaspoon vanilla extract
- Pink food coloring (optional, gel recommended)
- Sprinkles for decoration (optional)
How to Make Pink Lemonade Sheet Cake

Now that we have all our ingredients, let’s get baking! This easy pink lemonade cake is made in a sheet pan, which makes it perfect for sharing. The steps are straightforward, and the results are consistently delicious. Remember, baking is a science, so follow the instructions carefully, and you’ll be rewarded with a beautiful and tasty cake. Let’s get started!
This recipe will guide you through each step, ensuring a moist, flavorful, and visually appealing cake. If you’re new to baking, don’t worry! This is a great recipe to start with. If you’re looking for other summer dessert recipes, this one is a must-try. Let’s get started!
Step 1: Prepare the Cake Pan and Preheat the Oven
Before you do anything else, preheat your oven to 350°F (175°C). This ensures your oven is at the correct temperature when your cake batter is ready to go in. Next, prepare your 9×13 inch sheet pan. You can grease it with butter or cooking spray, then dust it with flour. This will prevent the cake from sticking to the pan, ensuring easy removal. Another great way to prepare your pan is by using parchment paper, cut to fit the bottom of the pan. If you’re not sure how to do this, take a look at how to prepare a cake pan to prevent sticking.
This is a crucial step for any cake, but especially important for a sheet cake, where the edges are more exposed. A well-prepared pan guarantees a clean release and a beautifully shaped cake. For the best results, use a high-quality sheet pan for even baking. If you skip this step, you might end up with a cake that sticks to the pan and breaks when you try to remove it.
Step 2: Whisk the Dry Ingredients
In a large bowl, whisk together the flour, baking powder, baking soda, and salt. This step is essential to ensure that the leavening agents (baking powder and baking soda) are evenly distributed throughout the batter. This will help the cake rise properly and have a light, airy texture. Sifting the dry ingredients is another way to ensure everything is well combined and to remove any lumps. If you would like to know the difference between different types of flour, you can check out all-purpose flour vs. cake flour.
Make sure to whisk thoroughly for about 30 seconds to a minute. This step ensures that all the ingredients are well mixed. This step is simple, but it has a big impact on the final texture of your cake. A well-combined dry mixture ensures a consistent rise and a tender crumb. This step is a small but mighty one in achieving a perfect cake.
Step 3: Cream the Butter and Sugar
In a separate large bowl, using an electric mixer, cream together the softened butter and sugar until light and fluffy. This process incorporates air into the butter, which is crucial for a light and airy cake. The mixture should be pale and fluffy, and this process usually takes about 3-5 minutes on medium speed. If you are new to creaming butter and sugar, you can check out how to cream butter and sugar.
The amount of time you cream the butter and sugar will impact the texture of your cake. This step is essential for creating a tender crumb and a cake that isn’t dense. The longer you cream, the more air you incorporate, leading to a lighter cake. This is a key step, so be patient and let the mixer do its work!
Step 4: Add Eggs and Vanilla
Beat in the eggs one at a time, mixing well after each addition. This ensures that the eggs are fully incorporated into the batter. Then, add the vanilla extract and mix until combined. Beating the eggs in one at a time helps to emulsify the batter, creating a smooth, consistent texture. The vanilla extract enhances the flavor of the cake, adding a warm, comforting note that complements the tartness of the pink lemonade.
Don’t rush this step. Proper incorporation of the eggs is crucial for the cake’s structure. If the eggs are not fully incorporated, the batter may separate, which can affect the final texture. This step also adds richness and flavor. This simple step is vital for the overall flavor profile.
Step 5: Alternate Adding Dry and Wet Ingredients
Gradually add the dry ingredients to the wet ingredients, alternating with the buttermilk. Begin and end with the dry ingredients. Mix until just combined. Be careful not to overmix the batter at this stage, as this can develop the gluten in the flour, resulting in a tough cake. Overmixing can lead to a dense cake, so be gentle and mix until everything is just incorporated.
This technique helps to prevent the batter from curdling and ensures a smooth, well-blended mixture. Once the batter is mixed, fold in the pink lemonade concentrate and a few drops of pink food coloring (if using). This is when your batter will transform into that beautiful pink color! This is a critical step in achieving the cake’s signature texture and flavor.
Step 6: Bake the Cake
Pour the batter into the prepared sheet pan and spread it evenly. Bake for 25-30 minutes, or until a toothpick inserted into the center comes out clean. Keep an eye on the cake during baking, as oven temperatures can vary. If the edges of the cake start to brown too quickly, you can loosely tent the pan with foil.
The baking time may vary depending on your oven, so it’s essential to check for doneness. If the toothpick comes out with wet batter, the cake needs more time. Once it’s done, let the cake cool completely in the pan before frosting. This is an important step to prevent the frosting from melting. If the cake sinks in the middle, you may want to check out why did my cake sink in the middle.
Step 7: Make the Pink Lemonade Frosting
While the cake is cooling, prepare the frosting. In a large bowl, cream the softened butter until light and fluffy. Gradually add the powdered sugar, mixing until well combined. Add the pink lemonade concentrate and vanilla extract, and mix until smooth and creamy. If you want a more vibrant pink color, add a few drops of pink food coloring and mix until combined.
Adjust the amount of powdered sugar to achieve your desired consistency. If the frosting is too thick, add a little more pink lemonade concentrate. If it’s too thin, add more powdered sugar. Be sure to taste the frosting and adjust the sweetness to your liking. This is a must-have ingredient for any pink lemonade dessert recipes!
Step 8: Frost and Decorate
Once the cake is completely cool, frost it with the pink lemonade frosting. You can spread the frosting evenly with a spatula or pipe it on for a more decorative look. Decorate with sprinkles, fresh strawberries, or any other toppings you like. If you want to make some pink lemonade cupcakes, you can use the same recipe and bake the batter in cupcake liners.
Get creative with your decorations! You can add fresh berries, edible flowers, or colorful sprinkles. The presentation is just as important as the taste. This cake is made for sharing, so make it look as good as it tastes. If you want to make a pink lemonade layer cake, you can bake the batter in separate round cake pans.
Tips for the Best Pink Lemonade Sheet Cake
To ensure your pink lemonade cake from scratch turns out perfectly, here are a few extra tips and tricks:
- Use quality ingredients: The better the ingredients, the better the cake!
- Don’t overmix: Overmixing can lead to a tough cake. Mix until just combined.
- Let the cake cool completely: This is crucial before frosting.
- Adjust the sweetness: Taste the frosting and adjust the sugar to your preference.
- Get creative with decorations: Have fun with it!
By following these tips, you’ll be well on your way to creating a fantastic cake!
Variations for Pink Lemonade Cake
This recipe is a great starting point, but feel free to get creative and customize it to your liking! Here are some ideas:
- Add lemon zest: For a more intense lemon flavor, add the zest of one lemon to the batter.
- Use different extracts: Experiment with other extracts, such as almond or raspberry.
- Add berries: Fold fresh or frozen berries into the batter for a burst of flavor.
- Make a glaze: Drizzle the cake with a pink lemonade glaze instead of frosting.
- Try a different pan: You can make a pink lemonade bundt cake or even pink lemonade cookies!
These variations are sure to create an even more memorable dessert. Feel free to experiment and find your favorite combination!
Frequently Asked Questions
Here are some common questions about making this delightful cake:
Can I use a pink lemonade cake mix instead? Yes, you can! Follow the package instructions and add a little extra pink lemonade concentrate for more flavor and color. This is a great shortcut if you’re short on time. Be sure to check the ingredients to ensure you are happy with the flavor profile.
How do I store the cake? Store the frosted cake in an airtight container at room temperature for up to 3 days, or in the refrigerator for up to a week. If you’re looking for other pink lemonade dessert recipes, this is one of the easiest to share!
Can I freeze the cake? Yes, you can freeze the unfrosted cake for up to 2 months. Wrap it tightly in plastic wrap and then in foil. Thaw it in the refrigerator overnight before frosting. Freezing the cake is a great way to make it ahead of time.
What if I don’t have buttermilk? You can make a buttermilk substitute by adding 1 tablespoon of white vinegar or lemon juice to 1 cup of milk. Let it sit for 5 minutes before using. This is a great tip for when you are in a pinch!
How can I make the frosting less sweet? You can reduce the amount of powdered sugar or add a pinch of salt to balance the sweetness. You can also add a little bit of lemon juice to cut through the sweetness. Making a lemon cake with pink frosting is a great alternative.